Matomo (formerly Piwik) is a self-hosted analytics software. The software is a wonderful way to analyze user behavior on your own website. The beauty of it is that Matomo is open source, unlike its big competitor Google Analytics.
Anyone who already uses Matomo knows that the software can be configured up and down. Anyone who wants to run a fast website also knows that Matomo does not always run optimally in most cases. With this I don't want to say that the basic configuration is not usable, rather the user is left the freedom of choice to adapt the software to their own needs. This is exactly where I want to start and show how and where you can start to get more out of Matomo. In general, this article will revolve around the optimal integration of the tracking code.
A quick look at the standard tracking code
Under the menu items Settings > Websites > Tracking Code you can configure and create the JavaScript tracking code for your website as usual. Without any settings selected, the code looks like this:
var _paq = _paq || [];
/* tracker methods like "setCustomDimension" should be called before "trackPageView" */
_paq.push(['trackPageView']);
_paq.push(['enableLinkTracking']);
(function() {
  var u="https://meine-matomo-server-url.de/";
  _paq.push(['setTrackerUrl', u+'matomo.php']);
  _paq.push(['setSiteId', 'X']);
  var d=document,
      g=d.createElement('script'),
      s=d.getElementsByTagName('script')[0];
  g.type='text/javascript';
  g.async=true;
  g.defer=true;
  g.src=u+'matomo.js';
  s.parentNode.insertBefore(g,s);
})();
Update:
- Statt
_paq.push(['setTrackerUrl', u+'piwik.php']);_paq.push(['setTrackerUrl', u+'matomo.php']);genutzt - Das gleiche gilt für
g.src=u+'piwik.js';g.src=u+'matomo.js';
How, what and why I customized Matomo's tracking script
No more handing out cookies
With _paq.push(['disableCookies']) we can forbid Matomo to set cookies, this has the advantage that we are much more privacy compliant. Also great, no cookies, no annoying cookie notice. Disadvantage: Matomo of course does not recognize returning visitors, but I can do without that very well.
Increase Matomo's heartbeat for a more realistic bounce rate
As Robin Pfeifer explains in his Blog article quite well, the bounce rate may not be determined correctly. This leads to many visits that are evaluated with a dwell time of just 0-10 seconds. Values that often do not reflect the actual visit time, as Matomo classifies a visit as a bounce if no further action is taken after entering the page.
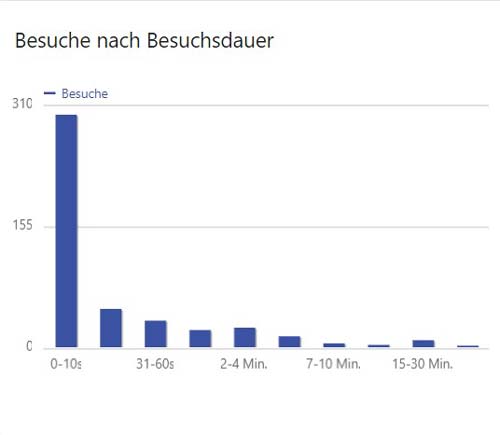
To counteract this, it is possible to influence the heartbeat, i.e. the time at which Matomo processes events on the page. With the small code snippet _paq.push(['enableHeartBeatTimer', 5]); you can set the beat to the second. In this case, the beat is set to 5 seconds.
Allow the tracking script to load later for better website speed
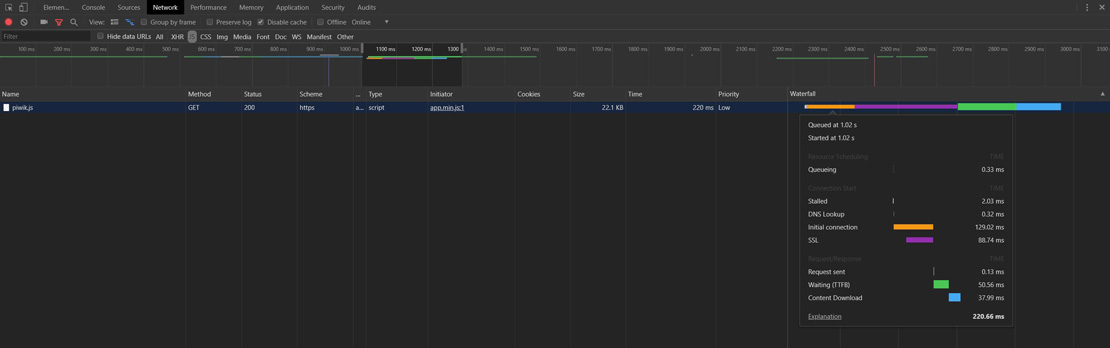
External resources have a problem, they are only as fast as the server they are running on. What I mean to say is that including Matomo in this case can slow down your website noticeably. As you can see on the screenshot below, several steps are necessary to load piwik.js matomo.js from the corresponding server. While the piwik matomo javascript is being loaded from the server, it slows down the page load of your website.
A good method is to delay the loading of the tracking script. To do this, a large part of the script is packed into the embedTrackingCode function and executed with a delay using setTimeout. In this example, the tracking script is executed after 5 milliseconds. This method is one of two that are available in the official Matomo documentation, is recommended.
var _paq = _paq || []
_paq.push(['disableCookies']); // Ab sofort verteilt Matomo keine Kekse (Cookies) mehr
_paq.push(['enableHeartBeatTimer', 5]); // Matomo bekommt Herzrasen: Der "Herzschlag" von Matomo wird auf alle 5 Sekunden erhöht
_paq.push(['trackPageView']);
_paq.push(['enableLinkTracking']);

function embedTrackingCode() {
  var u = '//meine-matomo-server-url.de/';
  _paq.push(['setTrackerUrl', u + 'matomo.php']);
  _paq.push(['setSiteId', 'X']); // Bei "X" steht normalerweise die ID der Seite die getrackt werden soll
  var d = document,
    g = d.createElement('script'),
    s = d.getElementsByTagName('script')[0]
  g.type = 'text/javascript';
  g.async = true;
  g.defer = true;
  g.src = u + 'matomo.js';
  s.parentNode.insertBefore(g, s);
}

setTimeout(function () {
  embedTrackingCode(); // Die Matomo Tracking Funktion wird ausgeführt
}, 5) // Die 5 steht für die Millisekunden anzahl in der die Funktion ausgeführt wird (kann man natürlich beliebig anpassen)
Optimize Matomo Javascript Tracker for speed
Cache and compress matomo.js
The piwik.js matomo.js file required by the Matomo server to analyze your visitors can also be optimized. Optimization means: Activating gzip/deflate compression and the browser cache on the server side. To do this, we need to make a few entries in the .htaccess of the Matomo installation. If this file does not yet exist, create the file in the root directory of your installation. Make sure that you are using an Apache server, the following code will not work on an Nginx server. In this example I use DEFLATE instead of GZIP. For the simple reason that the former compresses better. You can of course also use GZIP.
# ----------------------------------------------------------------------
# | Compression                                                        |
# ----------------------------------------------------------------------

# Die serverseitige Kompression via DEFLATE aktivieren

<IfModule mod_deflate.c>
  AddOutputFilterByType DEFLATE text/html text/plain text/css application/json
  AddOutputFilterByType DEFLATE text/javascript application/javascript application/x-javascript
  AddOutputFilterByType DEFLATE text/xml application/xml text/x-component
  <FilesMatch ".(ttf|otf|eot|svg)$" >
    SetOutputFilter DEFLATE
  </FilesMatch>
</IfModule>


# ----------------------------------------------------------------------
# | Expires headers                                                    |
# ----------------------------------------------------------------------

# Die Verweildauer der einzelnen Ressourcen für den Browser-Cache festlegen

<IfModule mod_expires.c>
  ExpiresActive On
  ExpiresDefault "access plus 1 month"
  ExpiresByType image/x-icon "access plus 1 year"
  ExpiresByType image/gif "access plus 1 month"
  ExpiresByType image/png "access plus 1 month"
  ExpiresByType image/jpg "access plus 1 month"
  ExpiresByType image/jpeg "access plus 1 month"
  ExpiresByType text/css "access plus 1 week"
  ExpiresByType application/javascript "access plus 1 week"
</IfModule>
Accelerate DNS resolution
Matomo is often hosted on a different domain than the embedded website. As soon as the tracking code is read, a DNS search must first be carried out. This means resolving the domain, e.g. https://meine-domain.de/, to the corresponding IP address. To speed up this search process a little, you can use dns-prefetch to determine the corresponding IP address of the domain earlier. This will save you up to 50ms.
<head>
    <link rel="dns-prefetch" href="//meine-matomo-server-url.de">
</head>
The link attribute is inserted in the area of your website.
Integrate Matomo into your WordPress website
Where is the script integrated?
For tracking scripts, it makes sense to include them at the beginning of the document (website). This ensures that the use of your site is documented as early as possible. Not only after a few milliseconds/seconds, as would be the case if you were to integrate the tracking script at the very bottom of your website. This ensures the most accurate analysis results possible on your website. A good place to include it is in the area. You will find it directly after the opening tag.
Integrate cleanly without a plugin
Attention! You don't need an extra plugin to integrate the Matomo tracking script into your WordPress website. If you have access to your funktions.php, you can easily and cleanly integrate the tracking script into WordPress without any detours. You can find out how this works in the section "The complete code".
<?php


function add_matomo_to_head() {
  ?>
    <!-- BEGIN Matomo -->
    <script>
      Hier das Matomo Tracking Script einfügen
    </script>
    <!-- END Matomo -->
  <?php
}
add_action('wp_head', 'add_matomo_to_head'); // Mittels Hook fügen wir unsere Funktion dem Head Bereich in WordPress hinzu


?>
The complete code
It's best to add the code to the function.php of your WordPress child theme. Either after the opening PHP tag <?php or at the very end of the document.
<?php

function add_matomo_to_head() {
  ?>
  <link rel="dns-prefetch" href="//meine-matomo-server-url.de">
    <!-- BEGIN Matomo -->
  <script>
    var _paq = _paq || []
    _paq.push(['disableCookies']); // Ab sofort verteilt Matomo keine Kekse (Cookies) mehr
    _paq.push(['enableHeartBeatTimer', 5]); // Matomo bekommt Herzrasen: Der "Herzschlag" von Matomo wird auf alle 5 Sekunden erhöht
    _paq.push(['trackPageView']);
    _paq.push(['enableLinkTracking']);

    function embedTrackingCode() {
    var u = '//meine-matomo-server-url.de/';
    _paq.push(['setTrackerUrl', u + 'matomo.php']);
    _paq.push(['setSiteId', 'X']); // Bei "X" steht normalerweise die ID der Seite die getrackt werden soll
    var d = document,
      g = d.createElement('script'),
      s = d.getElementsByTagName('script')[0]
    g.type = 'text/javascript';
    g.async = true;
    g.defer = true;
    g.src = u + 'matomo.js';
    s.parentNode.insertBefore(g, s);
    }

    setTimeout(function () {
    embedTrackingCode(); // Die Matomo Tracking Funktion wird ausgeführt
    }, 5) // Die 5 steht für die Millisekunden anzahl in der die Funktion ausgeführt wird (kann man natürlich beliebig anpassen)

  </script>
  <!-- END Matomo -->
  <?php
}
add_action( 'wp_head', 'add_matomo_to_head' ); // Mittels Hook fügen wir unsere Funktion dem Head Bereich in WordPress hinzu

?>
At this point I would like to refer to the official documentation of Matomo point out. All options are listed in detail here.